— This unlisted page is exclusively for our email subscribers —
So you’re starting a weight training program. Good for you!
You need a plan of attack. That’s what this guide is for.
Table of Contents
Clarify Your Goals
What do you want to get out of this?
You might want to be stronger, healthier, more athletic, or just look better.
Guess what – All of those goals have the same starting process: A good beginner strength program. You need a minimum base of strength before you start following some advanced program meant for people who are stronger than you. Forget those programs featured in bodybuilding magazines, at least for now. They aren’t for you. Those are for highly trained lifters who need that kind of volume and intensity to be able to make progress. You, on the other hand, will burn out right away trying it.
Strength Training
I’m putting a strong emphasis on a basic strength training / bodybuilding setup, with some additional notes for folks into Crossfit (or other conditioning work), and some consideration for your favorite piece of cardio equipment like a rower, elliptical, etc.
The reasons I emphasize a strength training setup are twofold.
First, I know strength equipment better than anything else, from personal experience in training, research, running a blog on strength equipment, and selling equipment professionally for over 10 years.
Second, strength training is for everybody. It’s for the elderly, who suffer from brittle bones because they don’t challenge their body with weight bearing exercises. It’s for women, who will never get “bulky” unless they are injecting hormones. It’s for people with joint pain who need better blood flow and to strengthen their tendons.
The bottom line is your body needs to be challenged. Your body is incredibly intelligent. When you do not challenge its strength regularly, it knows that strength is not important, and it will let its muscles, bones and tendons waste away. When you lift weights through a good program, your body says, “This IDIOT is lifting heavy crap all the time! We need to adapt or something bad is gonna happen!”
Compound Lifts
Bench presses, squats, deadlifts, pull ups and military presses, among others, are all compound lifts. They involve multiple muscle groups and force your body to work as one unit.
The setups I recommend are what you need to do compound lifts. Freeweights, as opposed to machines, are the best at achieving this because you are forced to balance and use multiple muscle groups, or even your whole body, not just lean on a couple muscles to do all the work.
Focusing on compound exercises for your workout has these advantages:
- It’s a Time Saver
You can get as much of a full body workout, or better, from a few compound exercises as you can a dozen isolation exercises - You Release Growth Hormones
Lifting heavy weights taxes your entire system. Your muscles struggle, your heart starts pounding, you sweat, and you mentally have to push yourself, which stimulates your central nervous system. This releases hormones that tell your body to get stronger. It doesn’t like being too weak to accomplish a task easily. Your nervous system doesn’t take you seriously unless your body is struggling. - You Become Functionally Stronger
Your body is smart. It wants to function smoothly and effectively as a unit. It wants to be athletic. Compound movements require not only strength, but coordination and balance. When you do only isolation exercises, one muscle group at a time such as with curls or many machine exercises, your body will not let one muscle group get too strong if it will throw off the balance.
For example, if you work your abs too much and not your back, your back might start hurting and you won’t get the six-pack you want. Likewise, if you work your biceps and not your triceps, your biceps will be limited in how strong they are allowed to get.
Basically, compound movements are way more effective than isolation movements at accomplishing strength and fitness goals.
Isolation exercises can be added in too, but they are a supplement. It’s mainly just professional bodybuilders and top athletes who can use a lot of isolation exercises because of the amount of time they spend in the gym daily. They can also be used in injury rehab.
When you have limited time and energy each day, including warmups, it doesn’t make sense to do one muscle at a time, and it won’t give you the results you want.
Follow a Program
You’re wasting your time just going into the gym and lifting without keeping meticulous track of your progress and knowing how you will proceed in the future.
You just wear yourself out. Sure, anything can sort of work, given enough time. But if you’re going to do it, you might as be smart about it.
Two great beginner strength programs are Mark Rippetoe’s Starting Strength and Jim Wendler’s 5-3-1.
Starting Strength is a little more intense, involving squatting and deadlifting on the same day, and more work sets at the top end of your capabilities. Because of that it’s a really good program to push a beginner to get strong as quickly as possible.
Get the book Starting Strength, Third Edition. Rip’s website is at www.startingstrength.com and he has a youtube channel with some good demonstration videos for beginners.
5-3-1 involves mostly the same exercises but spaces the three big exercises out to only one per day, so you’re doing each big exercise only once a week. This could result in slower progress. You could modify the program a little if you want to do each major exercise twice a week, for kind of a hybrid of Starting Strength and 3-2-1.
3-2-1 is detailed in the book 5-3-1: The Simplest and Most Effective Training Program to Increase Raw Strength, and his website is at jimwendler.com.
Learn Good Form
Learning good form is kind of hard to do on your own.
Keep the weight very light at first, and watch youtube videos on learning the deadlift, squat, and other exercises.
The basic principles of good form remain the same throughout pretty much all exercises.
One of the main things you do is keep your lower back stable by sticking your butt out, keeping that position tight throughout the movement, This will stabilize your spine.
This video is a great primer on saving yourself from lower back injuries that would ruin your life.
Exercise Demonstrations
See Rip’s youtube playlists of how to perform the major exercises properly:
- Bench Press
- Safety, Under the Bar, The Arch, Rip Coaching
- Overhead Press
- Learning to Press, Unweighted, Adding Weight, Rip Coaching
- Deadlift
- Setting Up, Sets of Five, Rip Coaching, 5 Steps
- Back Squat
- Without the Bar, Under the Bar, A Word on Depth, Rip Coaching, Proper Grip
- Power Clean
- 3 Positions, Putting it Together, Sets of 3
I also like Glenn Pendlay’s 3-part series on the power clean.
The above will get you going and help ensure that you don’t get hurt as you start lifting more and challenging yourself.
How to Avoid Injuries
Learning proper form and doing lots of warmup sets of increasing weight each workout is extremely important in weight lifting to avoid injuries, for young and old alike.
Conditioning your body with endurance, high intensity, and light weight exercises is also tremendously beneficial for avoiding lifting injuries. Jogging, sprinting, pushups, sports, bike riding or any other regular physical activity is a prerequisite before challenging yourself too hard with heavy weights. In other words, don’t jump from 0 to 100.
Basic Equipment: Olympic Weights, Bench, and Rack
If you have the budget, a good starting setup would be a 300lb weight set, power rack, and bench.
This will allow you to do the “big 3” powerlifting exercises: squat, deadlift and bench press. You will also be able to do overhead presses, pull ups and a variety of other compound and isolation exercises.
>> For the Starting Strength program mentioned above, see my article, The Best Barbell and Equipment for Starting Strength. The advice is similar to the below, but tailored specifically for that program.
Weight Set
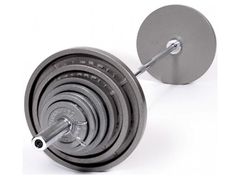
If nothing else, get a weight set. At least with it alone you can do deadlifts, cleans, military presses, and a few other exercises.
A 300lb weight set includes a 45lb bar, 255 lbs of olympic plates, and collars to hold the plates on.
(“olympic” basically denotes that the plates have 2” holes)
(also, “bar” and “barbell” are synonymous here)
“300 lbs is more than I need!”
No. Getting a 300lb set has to do with the variety of plates it has. You want to be able to use 45lb and 35lb plates to make your life easier loading and unloading weight.
“45lb? 35lb? What the heck are these sizes?”
I hear you. You learn to the do the math before long. This was an unfortunate conversion from kilogram denominated weights. We Americans are proud of our wonky imperial units of measure, so that’s just the way it is.
Most of the 300lb sets for sale have a relatively low-quality bar. It will work, but a nicer one is more pleasant to use for several reasons. You can always buy a barbell, plates and collars all individually. However, the sets are significantly lower priced than the individual components, so you might want to just buy a set and think about getting an additional nicer bar later on.
Power Rack
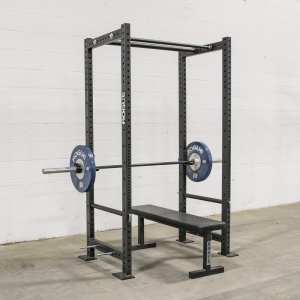
When you add a rack, you can start doing exercises that require the bar to be set at an adjustable starting height, such as squats and bench presses. Power racks also have safety bars that you set at just the right height to catch the bar should you fail that last rep, saving you from being crushed.
Not only that, it has a pull up bar and often has options for additional attachments.
And as a bonus, with the bar off the floor, it’s also easier for you to add and remove weight plates between sets.
Note: The barbell does NOT touch the rack while you’re lifting. You do true freeweight barbell exercises. A Smith machine, which you may have also seen, holds the bar and restricts movement to a straight plane of motion. The rack I’m talking about is not a machine. You do 100% of the work once you lift the weight off the rack.
The video here illustrates 51 exercises you can do with a power rack:
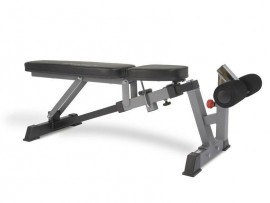
Bench
Throw a bench into the mix and it only gets better!
See this quick video for how a bench works with a power rack:
This type of bench doesn’t have any barbell holders on it. It’s also called a dumbbell bench. You already have the rack, so any barbell holders built into the bench would get in the way.
Slide the bench inside the rack and you’re ready to do bench presses.
A basic flat bench will work great.
If you get a bench with an adjustable backrest, you can also do incline and decline presses, which work slightly different muscle groups and add variety. But for flat bench pressing, nothing beats a simple flat bench. Because nothing on it moves, it’s more stable, feels more solid, and there’s no separate butt and back pads that have uncomfortable gaps between them.
That’s it! For starters, just a weight set, rack, and bench are all you need.
For a bump up in your quality of equipment, I have a guide on the best barbell and equipment for Starting Strength.
Fleshing Out Your Home Gym
Now that you have the basics, there are a few other considerations…
Storage
Looks handy, doesn’t it? Or were you planning on leaving all your weights on the floor?
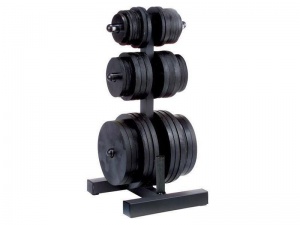
A weight tree like this will easily hold all the plates in your 300lb weight set.
Flooring
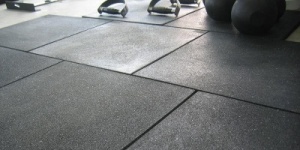
Rubber flooring is almost a must.
If you find a great deal on “rubber foam” mats, don’t do it. It’s EVA foam. Nothing rubber about it. I got by with some EVA foam mats for a while. I really don’t recommend it.
If you have a Tractor Supply store near you, you can get some 6ft x 4ft x 3/4in rubber “stall mats” at an unbeatable price. Or find an equestrian or farmer type store. You can also order rubber mats online, in the big 4×6’ sheets or smaller interlocking tiles. For the big sheets, you need at least two for the rack and bench. Four of them will give you extra room.
As far as the floor you’re laying the mats over, a concrete subfloor is ideal, and it’s the only subfloor you should have if you plan on dropping weights at all.
For a medium- or high-pile carpet, you’re going to either need to pull up the carpet or lay sheets of 3/4″ plywood over it. (The plywood will actually be 23/32″, or just under 3/4″)
For low-pile commercial carpet, you can lay mats directly on them.
For tile or hardwood floors, put down some thin foam underlay, plywood on top of that, and the rubber mats on top of that. This will keep the subfloor from getting scuffed up and protect it better from dropped weights.
For a more thorough overview of rubber flooring, see my Gym Flooring Guide.
Dumbbells
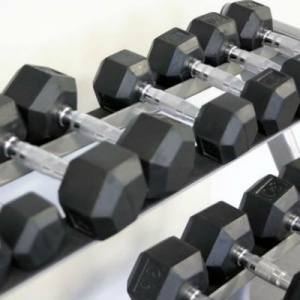
The next item most people get is some kind of dumbbell set or adjustable dumbbells. The most space-saving and cost-saving option is adjustable dumbbells.
The bench you already got for use with the power rack is also a dumbbell bench, so you can just slide it out of the rack and use it alone.
If you have the space and the budget, solid dumbbells like the rubber ones shown above are much more satisfying to lift. You can get a 5-50lb set and add 60 lbs and up as needed. Being able to add another couple plates onto adjustable dumbbells isn’t quite as satisfying as moving on to the bigger dumbbells that have thus far set there on the rack untouched. There’s something about being able to use the big toys.
Lat Machine
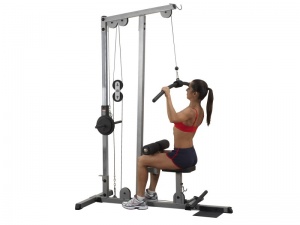
A lot of folks can’t do a pull up. For them, a lat machine is the answer. Even if you can do a few pull ups, you can get a lot out of a lat machine because the pulley systems facilitate other exercises.
There are some bodybuilding.com forum threads where experienced lifters have shared that one of the next purchases beyond the basic weight set, rack and bench would be a lat machine.
You’ve certainly seen them at commercial gyms. A seat and a bar you pull down to your chest, just like a pull up but with as light weight as you need instead of having to pull your body weight.
They’re called lat machines because the lat pull down exercise generally works your lat (lattisimus dorsi) muscles that go from under your armpits, down the sides of your ribcage, and down to your lower back. Biceps and other muscles are involved too.
The thing with a lat machine is it isn’t just a lat machine. Every lat machine has another pulley near the floor, so you can do all kinds of exercises where you pull upwards or sideways. Possibilities include seated rows, curls, glute kickbacks, leg extensions, leg curls, and other less common exercises.
Some power racks have an optional lat attachment, basically a lat machine that extends out the rear of the power rack, out of the way of any squats or presses you would do inside the rack. But beware – a lot of these attachments use bushings that the carriage slides on. This can be ok, but it won’t be as friction-free as carriages that roll on bearings like those you’ll see in a commercial gym. The bushings can wear a little over time if you use it a lot, increasing the friction even more.
Rower or Other Cardio Equipment
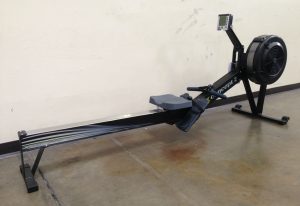
The current rage in cardio is rowing. It works your whole body like no other cardio machine can.
The go-to rower is a Concept2 Model D.
If you want to waste time doing research before coming to the same conclusion on your own that the Model D is the one to get, see my Air Rowers Comparison.
Also see my Tips on Buying a Second-Hand Concept2 Rower.
One cool thing about these for a home gym is they quickly fold up to save space between workouts. You can’t do that with any decent treadmill, elliptical, or bike.
If you’re set on a treadmill, elliptical, or bike, either fork out good money for a commercial quality unit or find a used commercial unit on Craigslist. A home grade unit is gonna be shaky and parts will need to be replaced. They aren’t actually made to be used. They’re made to be used for a few weeks and then set aside with a “I’ll definitely get back into using this soon” promise. Commercial units get used for hours every day.
Space Limitations
Short Ceiling
Power racks’ typical 7ft height poses a problem in residential units with 8ft ceilings. At first thought you might figure it will fit, but you’re in danger of going through the ceiling during pull ups. To be safe you want 12” of clearance above the bar for your head.
Basements are even worse, with their 7ft ceilings or sometimes not even that.
Two possible solutions to getting a rack in a low ceiling room…
- Get a “shortie” power rack, only 6ft tall.
I only recommend this for users who are under 5’5”tall themselves. In that case, hey, a 6ft power rack would fit you fine! You’ll bend your knees doing pull ups, but taller folks do that anyway on 7ft racks.
For anyone approaching 6ft tall, a shortie power rack is a bad idea. You’ll bang your head on the pull up bar just walking into it, and if you manage that, you’ll bang your head on the upper rear crossbeam as you re-rack your squat. Try to do pull ups, even with bent knees, and your knees will hit the floor. - Forego a power rack and get a good half rack / squat stand.
This can be a good move for anyone. There are a couple excellent half racks out there, by Rogue and also Titan Fitness, that fit the bill for being only 6ft tall and with nice long safety bars.
Some options for both of these are laid out in my article, Some Shortie Power Racks for Low Ceilings and Basements.
Limited Floor Space
For a power rack and bench setup, you need a 10ft x 7ft space.
Sure, the rack is only like 4ft x 4ft, but you’re using a 7ft bar in it. You need space on both sides of the bar for you to stand while loading plates. You need space in front of the rack for you to slide your bench out.
If you don’t have that space, you can:
- Do dumbbell work only.
You can get away with a mere 5ft wide space, enough room for you to lay down on the bench and do dumbbell presses, with room to spare for safety’s sake. You miss out on all the benefits of a rack this way, but in a pinch, it’s better than nothing! - Get a 6ft bar.
In the odd situation where you’ve got 9ft but not 10ft of space, some 6ft bars will do the job. Be careful here, as many cheaper 6ft bars do not have enough room between the inside collars to fit on a power rack. We sell some that basically just have the sleeves cut 6” shorter on each side. - Use portable squat stands.
These can be dicey. Some experienced lifters are fine with them, because they know that lifting heavy with them isn’t as safe, due to the lack of safety bars (well, sometimes you get teeny tiny safety bars like on these ones) and those people prepare and adjust accordingly to avoid a horrible mishap. Beginners need to be careful. See the pic below. Certain good models like this one can be weighed down with plates on the bottom as shown to help with stability. They can be stored away in a closet or corner to save space.
For more info, see my article, How Much Space Do You Need for a Home Gym?
Nutrition
Look, it’s 2018. Stop following 1960s diet protocols. Stop following the 1980s food pyramid and eating gobs and gobs of rice, bread, or pasta. It makes you fat, fuels your sugar/starch cravings, makes you crash, and causes inflammation that I guarantee will make your body hurt more during your training.
You avoid fat, because “fat makes you fat”, right? The same way carrots turn you orange?
Your diet is a huge part of your training. Lifting heavy shit is hard on you. Without the right diet you barely have the energy to finish your workout and have barely enough left to finish your day and dread the next workout.
The best thing you can do is do the opposite of everything you’ve been doing with nutrition.
- Stop counting calories. You’re lifting weights now, and your caloric demands are gonna skyrocket, even on off days while you recover, and even more so over time as you build muscle that burns energy just sitting there. You need the extra energy, without which you won’t build muscle or get stronger.
- Lay off the carbs and sugar. Bring it down to very low starch, very little sugary fruit, and virtually zero added sugars, then start adding back in carbs (but no added sugar) as much as necessary to get your energy levels back up. If you add too much, your energy levels will bounce up and down, you’ll gain fat, and you will suffer inflammation in your joints that will hinder your training, and you’ll get inflammation in your intestines that will prevent you from processing food efficiently.
- Eat as much protein and fat as you want. It’s not going to make you fat, because it doesn’t spike your blood sugar, which is what causes your body to stuff its fat cells fuller. Excess protein, fat and fiber goes right through you.