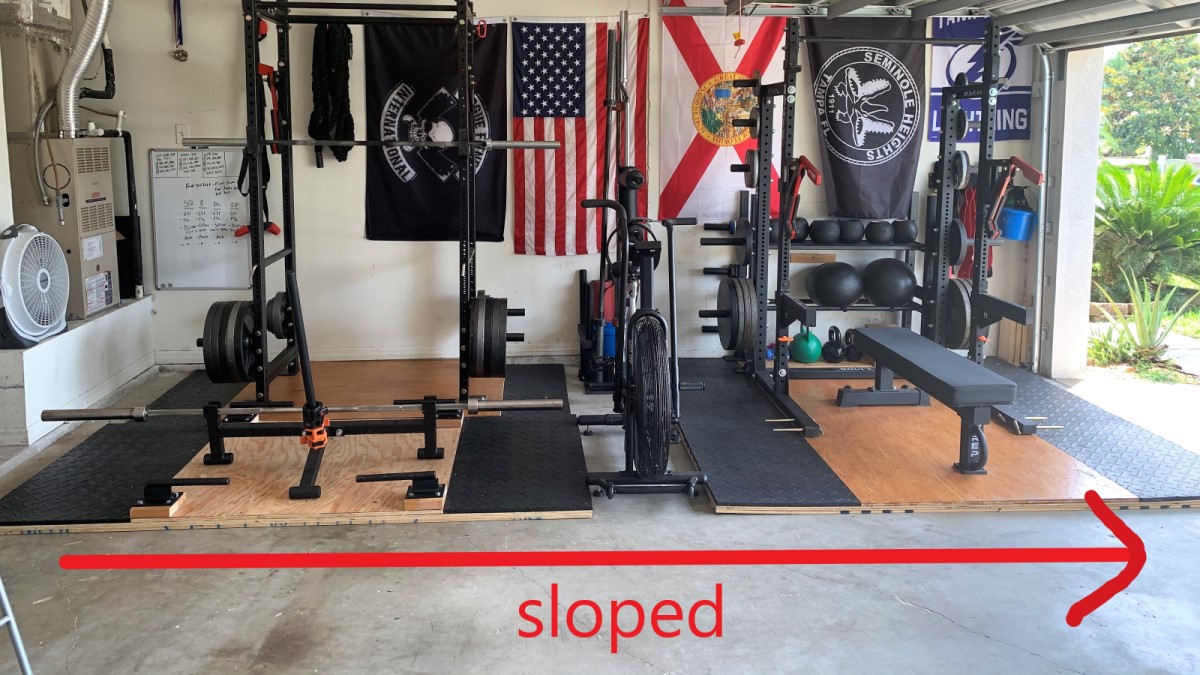
Your garage looks absolutely perfect for a gym. Concrete floor, oodles of empty space… And a floor that turns out to not be level. Doh!
This is no accident. Due to building codes, a garage has a minimum slope towards the opening of 1/8″ per foot to cause flammable liquids like gasoline or oil to drain out. Builders might even make it 1/4″ per foot to be safe. This represents 1 or 2 degrees of slope, just enough to mess you up.
For a gym, what you end up with is a floor that looks level until your barbell rolls out of your garage when you load it up for deadlifts.
Here are some tips to handle it effectively.
Table of Contents
Stopping Deadlifts / Cleans From Rolling
The below thread on reddit features a jerry-rigged type of solution to stop your barbell from rolling on a non-level surface. Put a piece of cardboard under one of your rubber mats to create a bit of a bulge to stop the roll.
That solution assumes that the only thing you’re doing in that area of your gym is deadlifts. For your next exercise you’ve got this stupid bulge in the floor.
I prefer a more elegant or cleaner solution. I’ve already written about the Dead Wedge being a nice tool for easily loading multiple plates on your bar for deadlifts. It also happens to be good stopper. You should already have one for its intended purpose. Get two instead (Rogue sells them), set them on the floor, and they’ll stop both sides of the barbell from rolling away between sets.
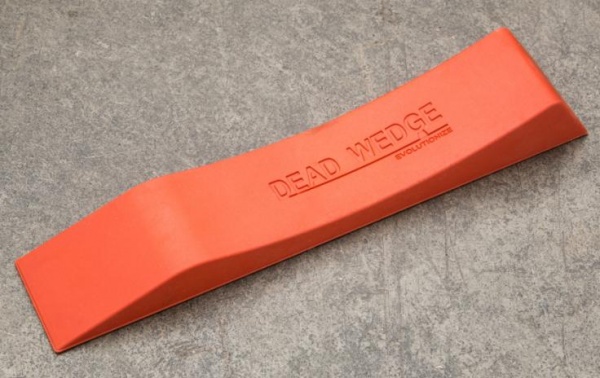
Another object you already have might work. The Dead Wedge just happens to be a nice shape and material for this. It won’t slide and is lightweight and small.
Making a Platform Level
If you have a lifting platform, your options expand a bit.
Bill Coyne has a pretty simple, inexpensive solution for leveling your platform on a sloped floor.
It involves several pieces of thin plywood that you cut and stagger down to create a wedge that goes under your platform. This compensates for a 2″ drop over your 8ft platform, or adjust to how ever much you need.
The below guide from knoechel on imgur also illustrates this same concept.
I’ve seen another design where someone used 2×6 boards trimmed down to several heights to act as wedges in a similar way. The plywood solution is much better. It disperses the load well across the whole area under the platform.
Your Power Rack
You can use the above solution for creating a wedge for a platform that holds your rack to make it level.
Without doing that, which direction should you face your rack?
The most natural spot would be against the back wall. But with the slope your toes will be higher than your heels and prevent you from squatting quite as low. Realistically we’re talking a 1-2 degree slope and you might not even notice. Still, it could get in your head.
Doing that and facing backwards in the rack while you squat, ie: facing towards the garage door, is another option if you have a full power rack. With a squat rack / half rack you’ll have to turn it around and possibly have to give extra space behind it for bench presses.
Putting the rack against a side wall isn’t recommended without leveling it. One side of your body will be lower than the other. Worse, you’ll do your set with the bar balanced level and one side of the bar will always hit the non-level J cups first when you re-rack.
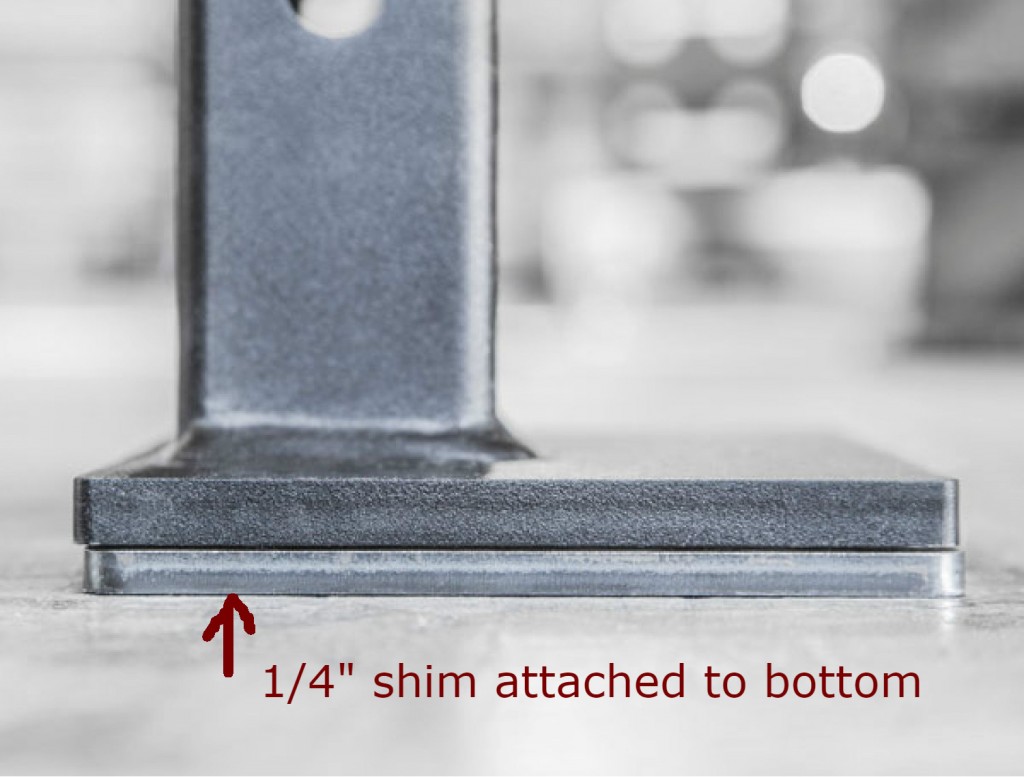
To level your rack you can put shims on the downslope side. Rogue sells sets of 7″x5″ steel shims in 1/4″ or 5/64″ thickness that are compatible with the Infinity, Monster, or Monster Lite racks and rigs and are meant to be put in place as you bolt down your rack feet. They’re just a set of steel plates with channels in them to allow for the screws going through.
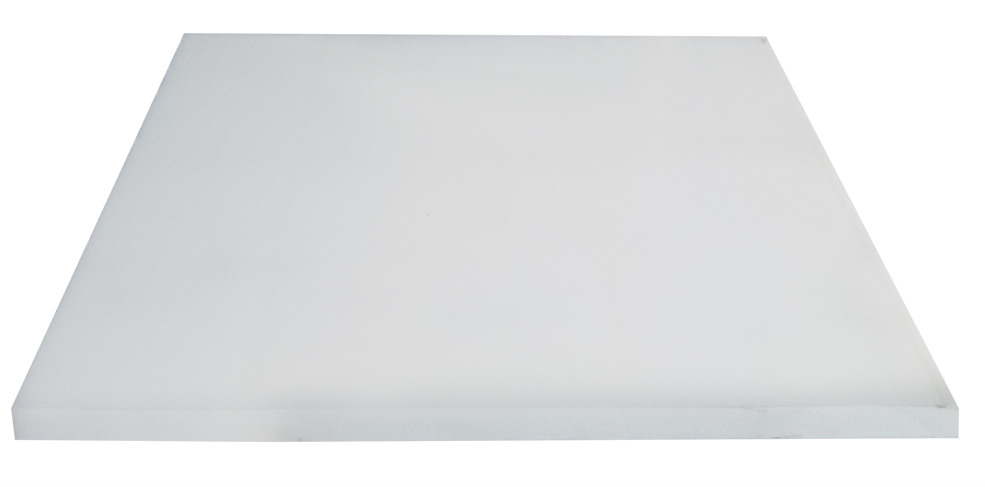
The easiest DIY thing might be UHMW plastic shims that you can cut and drill. UHMW is tough material used on power rack J-cups and can be cut with a power saw only. UHMW sheets can be found at these search links on Amazon.
For a rack with feet placed 4ft apart, on each lower sloped foot you would need 1/2″ worth of shims on a 1 degree slope, or 1″ of shims on a 2 degree slope. Find a way to measure your floor’s slope first with an angle or level tool to see exactly how much shimming you need.
Shimming works best with the rack faced up or down the slope. With it sideways you can get it level, but your own left or right foot will be lower. You might find that part to be not a big deal. You will naturally hold the barbell level with gravity, so if at least your rack is level then you’ll be rid of most of the balance issue with unracking the bar, and you’ll re-rack the bar evenly. You might end up with slightly unbalanced muscle development, but you might not notice such a thing at all.
Final Thoughts
With some exercises the slope doesn’t matter much. Your body is meant to traverse rough ground all over the Earth and lift objects on various types of uneven ground and deal with asymmetric forces.
Any other good ways you’ve found to deal with a sloped floor?
I might just have to take back my previous comment. Apparently UHMW has a compressive strength of “580 – 12000 psi”. That’s a large range, but even the low end is enough to cancel my earlier worries about ability to handle the load.
Yep, it’s pretty strong stuff!
*Plastic* shims?! I’d be very surprised if any plastic on the planet, even my Pelican case, could withstand the repeated pressure imparted by those small metal feet loaded with hundreds of pounds.
Great post! I didn’t realize my garage was slanted (duh) and worked out on my rack for quite some time. I then went to a regular gym and squatted. I had significant DOMs in the up slope a day after! I know ensure I do both directions when I squat for each weight.
That’s a good idea. If your rack and space can accommodate setting up the weight in the other direction, that should do the trick to even out the work on your body.
Rather than deal with a platform, I just make sure equipment is oriented perpendicular to the line of slope. This makes everything symmetrical (left/right). Barbells will still roll but if those are kept within the cage, the front legs will act as stoppers anyway.
Tall equipment might need to be leveled using shims, especially with higher slopes.
I need a platform that I can move so that I can park a car in the same garage space as where I lift. How heavy is this platform?
Usually they’re too heavy to move. I believe people have driven their cars onto platforms without much of an issue. Mainly the edge of the platform would be susceptible to getting crushed. Maybe bevel the edge somehow or get a little solid ramp.
I assume UHMW would be slippery. How do you secure multiple UHMW pieces together underneath the rack?
I would glue or epoxy the UHMW pieces together.
Also, I guess I was thinking only of a floor-mounted rack that has bolt holes in it that could go through the pieces. For a freestanding rack you would need something like this, but bigger to fit over the frame and drill only into the UHMW. Might be hard, with how thin the UHMW is. Epoxying them to the rack I guess is possible but that’s kind of a severe alteration to be doing to a nice rack. I should add some more notes to the article about this. Keep the questions coming!
Thanks for the clarification. Have you looked into adding rubber/EVA foam tiles beneath the lower end of the rack to level them? They are usually large (2x2ft) and non-slippery.
EVA is too soft. High density rubber pieces like rubber flooring pieces or anything denser would be good.
I have my rack bolted down lengthwise in my garage, so one side is a little lower than the other–had to shim it with a shim kit from Rogue. As for the weights, I just have to remember to leave them lengthwise too.
Thanks for the tip! I didn’t know about Rogue’s shims. I have added a note on those and also shimming with UHMW sheets.